The plastic anatomy of man and animals is described. The book was written by an artist with a higher medical education, due to which only the material that is of practical value for artists is presented; this and especially the presentation of the method of image on anatomical basis, the book compares favorably with other manuals of the same profile.
In the second edition of the book Plastic anatomy of a human, four-legged animals and birds”(the first was published in 1971), the visual material was expanded, showing the structure of humans, animals and birds, the text was revised and supplemented.
Designed for students of secondary specialized educational institutions of fine arts. Can be used in the practical work of the artist.
“To feel, to know, to be able is a complete art,” defines the art of an artist, an outstanding artist and teacher P. P. Chistyakov. Depicting a person, an animal, the artist must know its structure, its anatomy. “The hand consists of bones, tendons, muscles, covered with skin. To use it properly, you need to study the bones, build them in accordance ... ”says P.P. Chistyakov in another place, setting out his program requirements, and he, in a letter to P.F. Iseev, speaking about anatomy and perspective, with writes with chagrin: “The students know these subjects, but do they know how to apply them in practice? Not! Not! And no!
Do our contemporaries - artists know how to put into practice the knowledge of plastic anatomy, and if they don’t, then whose fault is it? These are the questions that should be of interest to artists-educators today, including the author of this book.
In the preface to the first, far from perfect edition of the book "Plastic Anatomy of Man, Quadrupeds and Birds", the author wrote that most textbooks on plastic anatomy do not fully correspond to the task pursued by its study - to provide direct assistance to students in mastering form. Textbooks talk about the individual elements of the form: bones, joints, muscles, but do not say anything about how these individual forms are assembled into a single whole. The textbooks do not say anything about the general constructive connecting role of the skeleton, about the interactions of parts of the skeleton in space, about the formation of generalized muscle arrays, about the entry of some arrays into others, that is, about muscle connection. Moreover, nothing is said about the most important - the final stage of the study of plastic anatomy - the anatomical construction of the picture.
Plastic anatomy is taught, and in the manuals it is presented in a very conscientious manner, with full knowledge of the factual material, but with such a "disengagement from production" that it does not achieve its direct goal. A student can conscientiously attend a course, and receive no information about the application of anatomy in practice when building a figure. Teachers of visual disciplines do not always use three-dimensional anatomical construction (although they study anatomy), they cannot freely master the drawing of a human figure, cannot use a model, but only copies the model, which leads to slavish dependence on the model, to a naturalistic drawing.
Disunity between the study of plastic anatomy and its application is characteristic of many manuals and methods of teaching this subject.
The author of the book "Plastic Anatomy of Man, Four-footed Animals and Birds" by education is an anatomist doctor and at the same time an artist - a professional who experienced this disunity in full, gropingly, with great difficulty overcame it, and in the process of teaching he gradually mastered plastic anatomy as a single visual discipline, including both information on plastic anatomy and anatomical construction.
When working on this book, the author tried to fill the gap that is mentioned here and present the subject as a single pictorial discipline. In addition, on the basis of comparative anatomy, that is, visually comparing and drawing parallels between the anatomical structure of humans, four-legged animals and birds, the author additionally outlined the brief information necessary for students about the anatomical structure of animals and the method of depicting them on constructive anatomical foundations.
Without increasing the amount of factual material presented (bones, joints, muscles that affect the external form and were already described in the first edition), the author focused on the plastic part of the presentation.
In the second edition, preliminary plastic reviews of parts of the living body are significantly expanded and refined, corresponding to the specific anatomical material that is currently being described. A student either in the classroom on a live model or at home on himself can immediately get a concrete idea of that part of the general (living body) body that he is currently studying.
The author hopes that the second revised and expanded edition will be accepted by students as well as the first one, especially since, despite the need to strictly adhere to a certain program (and maybe just for this reason), the book, in addition to students, can be useful to a wide range of artists and serve as a self-instruction manual and reference book for persons who have not studied plastic anatomy.
Plastic anatomy of man, four-legged animals and birds | M. Ts. Rabinovich | Buy books | ISBN 978-5-9916-7581-9
Download the book "Plastic Anatomy of Man, Quadrupeds and Birds" for free for informational purposes!
See also other articles:
Perhaps many people want to draw a wolf howling at the moon for Halloween. Or they just want to draw a wolf. Or they are already drawing wolves with might and main, but they are not entirely satisfied with the results. There are many references on the net, and we will help you figure out how the forest predator works from the inside, and avoid many mistakes.
Consider the skeleton of the most common wolf. The bones and their structure in wolves are not the same as in humans. The figure is somewhat schematic, but gives an idea of the general device. The largest bones of wolves are the humeri. The skeleton of a wolf is ideally suited for fast running.

One such picture is not enough to thoroughly study the bone structure of the animal, so we advise you to draw the skeletons in different angles and poses. There is not so much such material on the net, so it is worth finding literature on animal anatomy. The more material you study, the better and more varied the results will be. And if you want to portray a zombie wolf, then you simply need to know the skeleton.

In the figure you see a simplified image of the internal organs of canines. We emphasize that these are only basic forms, and not a detailed sketch. If you are drawing some kind of bloody battles between angry wolves, you need to know the inner workings.
Captions on the picture: (left) esophagus, trachea, heart, (top) lungs. Stomach, spleen, rectum, (below) liver, intestines.
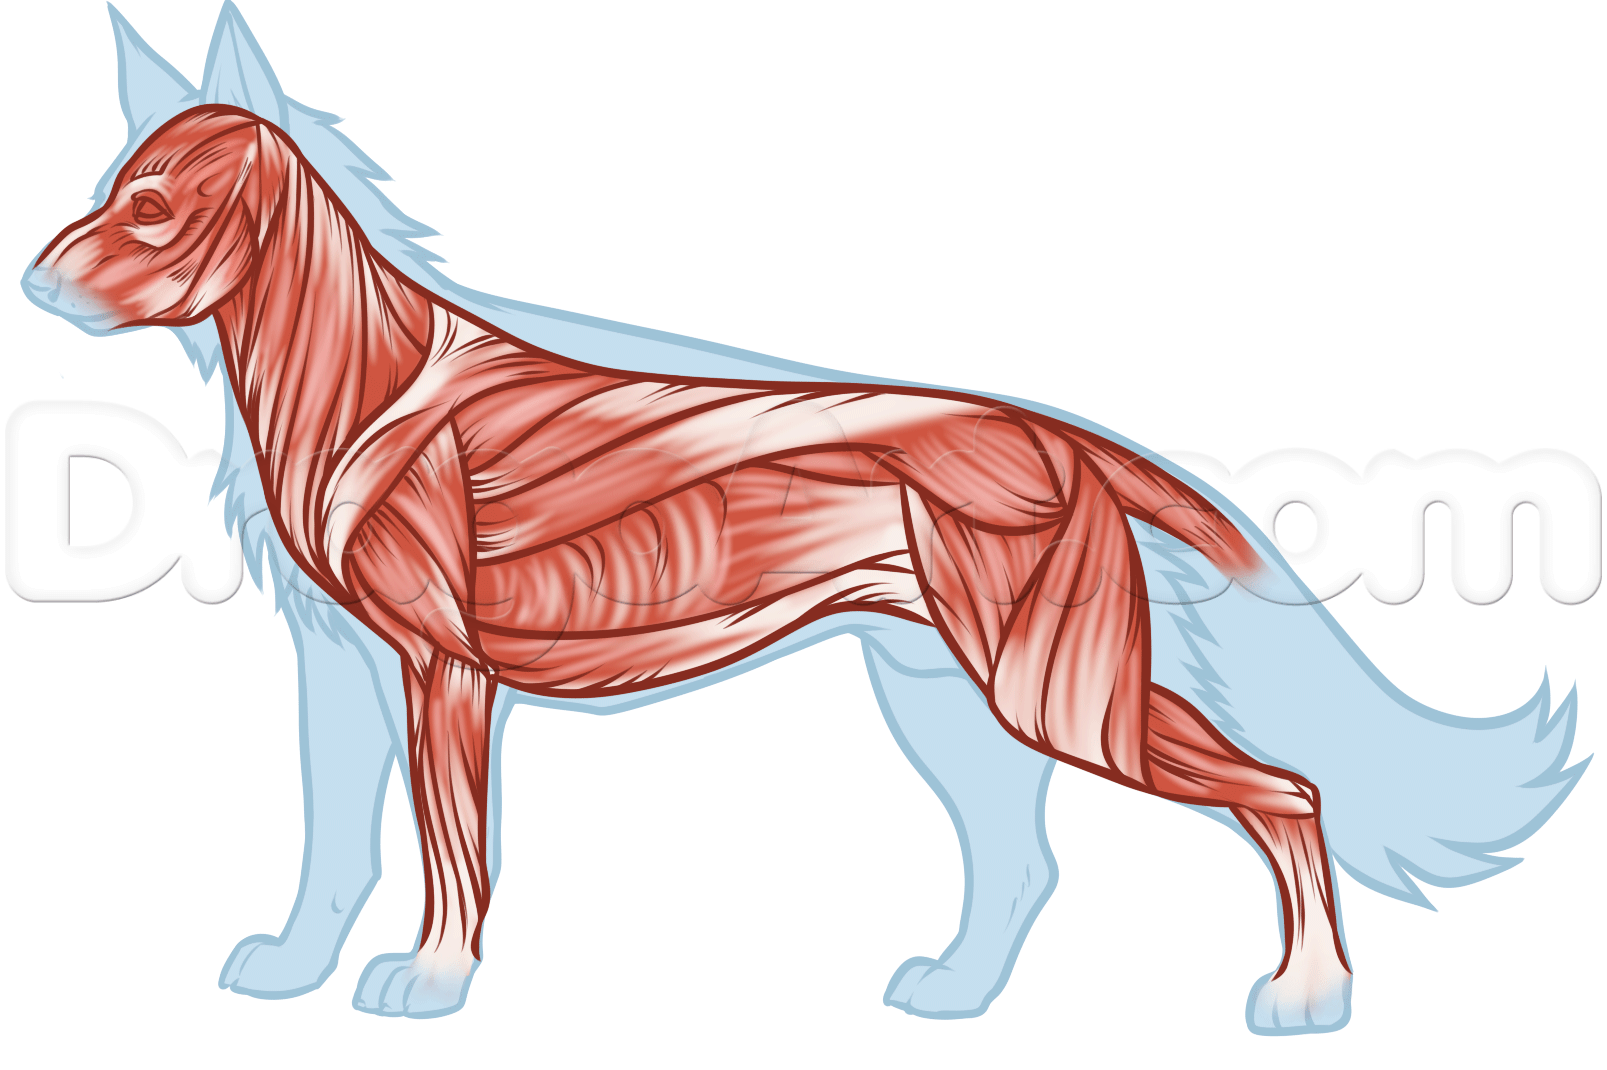
Now you see the structure of the muscular corset. Study the direction of the muscles and tendons, their length, how they intersect with each other.

This picture shows where the wolf has which part and what it is called. Inscriptions: (bottom) muzzle, flanks, cheek, chest, forearm, elbow, lower leg, side, croup, tail, (top) withers, shoulder, thigh.
It is important for a beginner animalist to understand why the body of a wolf has such a shape, and to understand it from the inside. In addition, if you draw your own (or someone else's) dog from different angles, without using references, you will quickly understand exactly how to draw some details. The lower legs of the hind legs of the wolf are much shorter than the thighs, although in cartoon pictures they are often thin and long.

Again, you need to understand why the head looks like this, and also understand from the inside. The illustration shows the skull and the shape of the teeth. The upper jaw always overlaps the lower, i.e. when the mouth is closed, the upper jaw will cover the lower one like the lid of a box, and the upper teeth will half cover the lower ones.

Here we have a nice sketch of wolf paws, because not all artists understand exactly how they are arranged. If you want to create realistic drawings, it will be useful to draw different paws from photographs.
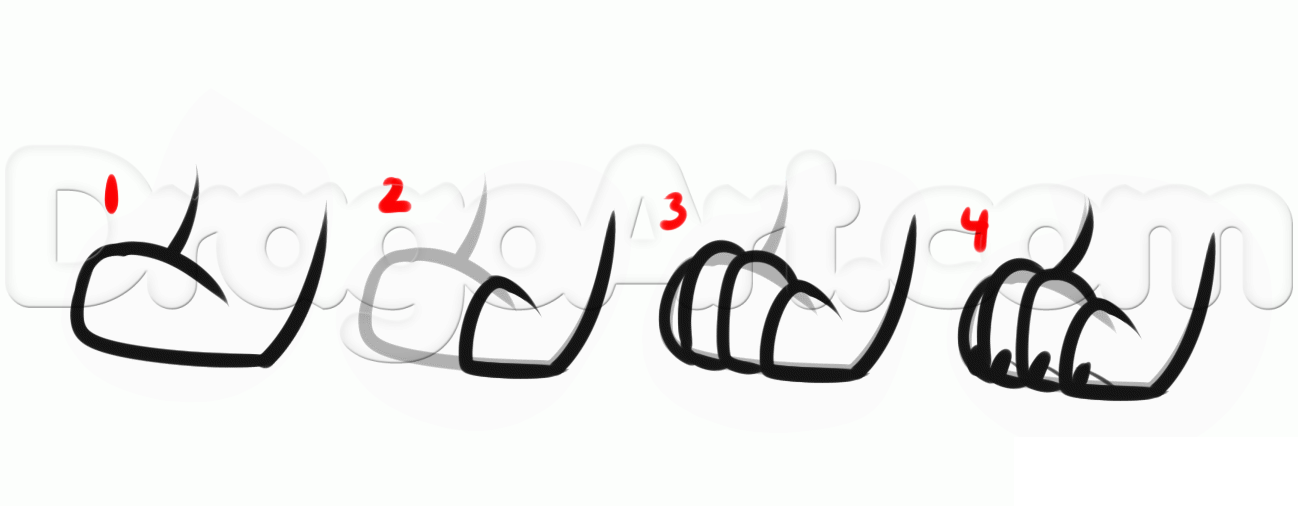
7. And now quickly draw the paw of the wolf. First sketch out the entire foot, then add the first toe and then the rest of the toes. At the end we will draw the claws.

8. The eyes of wolves are very clearly defined. The iris is very bright, and the pupil is perfectly visible. But the shape and color may vary.
This concludes our brief overview of wolf anatomy. Good luck drawing!
M.: Higher school, 1978. - 208 p.
The plastic anatomy of humans and animals is described. The book was written by an artist with a higher medical education, due to which only the material that is of practical value for artists is presented; this and especially the presentation of the method of image on anatomical basis, the book compares favorably with other manuals of the same profile. In the second edition (the first one was published in 1971), the visual material showing the structure of man, animals and birds was expanded, the text was revised and supplemented. Designed for students of secondary specialized educational institutions of fine arts. Can be used in the practical work of the artist.
Format: djvu
The size: 26 MB
Download: yandex.disk
CONTENT
Preface 3
Section I. HUMAN PLASTIC ANATOMY
Introduction 5
Doctrine of Bones 15
General concept of the skeleton 15
Joints between bones - sutures, cartilage, joints 16
Trunk skeleton 18
Vertebral column 18
Chest 20
Pelvic bones (or pelvic girdle) 22
Joints, adhesions, movements and plastics of the trunk 23
Free lower limb skeleton - legs 27
Femur 27
Leg bones 29
Foot skeleton 31
Joints, movements and plastics of the lower limb 33
Shoulder skeleton 37
Skeleton of free upper limb - arms 39
Humerus 39
Forearm bones 40
Skeleton hand 43
Joints of the hand, its movements and plasticity 45
Joints, movements and plastics of the shoulder girdle and arm 46
Skull 49
Brain skull 51
Facial skull 53
Movements, plasticity and construction of the head 55
Analysis of the skeletal and muscular connection of a standing figure and its volumetric construction based on the skeleton and generalized muscle arrays 58
Muscle Teaching 70
Trunk muscles 74
The joint work of the muscles of the body, its plasticity and construction 79
Pelvic and thigh muscles 81
Pelvic muscles 81
Muscles of the thigh 85
Leg and foot muscles 89
Calf muscles 90
Muscles of the foot 93
Movement, plasticity and construction of the legs and pelvis 94
Muscles of the shoulder girdle 98
Muscles that move the shoulder girdle 100
Muscles connecting the shoulder girdle with the shoulder 104
Muscles running from the trunk to the shoulder 105
Arm muscles 108
Shoulder muscles PO
Muscles of the forearm 111
Muscles and plasticity of the hand 115
Movements" plastic and construction of the shoulder girdle and arm 118
Muscles and plastics of the neck 122
Plasticity, movements and construction of a neck with a head 128
Muscles of the head, its details and plastic anatomy of the sense organs 130
Mimic muscles 133
Chewing muscles 141
Eye 143
Nose 146
Roth 147
Ear 148
Center of gravity and balance 149
Proportions 152
Parsing and building a figure based on the skeleton and muscles 155
Plate I. A. A. Bryullov. "Sitter with a Pole" 155
Table IL B> I. Surikov, "Wrestler" 158
Table IIL A-P. Losenko. "Sitter sitting on a stone" (oil study) 159
Table IV, A. I. Ivanov, "The Model". 162
The emergence of the contour and its role in working on the image of a person 165
Section II PLASTIC ANATOMY OF FOUR-FOODED ANIMALS AND BIRDS
Brief outline of the plastic anatomy of quadrupeds 167
Mammals 167
Frog, lizard 184
Brief outline of the plastic anatomy of birds 185
Literature 189
Appendix (illustrations) 190
Cats rule the internet! No doubt one day they will finally seize control of the world in general and humanity in particular. By drawing cats, you can understand what they are actually made of. But you need to know the enemy in person But seriously, in this lesson we will get acquainted with the anatomical structure of cats and learn how to correctly depict them in illustrations.

1. The structure of the cat's skeleton
Studying the structure of the skeleton is the first step to drawing a believable pose. Everything else rests on the bones, and it is they that primarily determine the range of possible movement of the body.

Luckily, we don't have to memorize the shape of each bone. It is enough to remember their length and the places in which they are connected to each other. The good news is that most four-legged animals have a similar skeletal structure. Only the length of the bones and the distance between them differ. Learn this material now, and you won't need to go back to these basics again.
You need to remember the structure of the skeleton as a group of ovals (joints, skull, chest, hips) and lines (bones, spine). After you remember this, you can draw any cat pose.

There is one more thing to remember: each joint has its own range of motion. If you violate these restrictions, your cat will look broken. To understand this range, take a close look at the animated picture below. While running, the cat uses its joints to the full extent. As you can see, all movements look natural.

What is worth noting:
You can say, "I don't need it. I feel correct posture". Perhaps, but there are a few mistakes that most people make due to simple inattention.
This is a popular way of depicting a skeleton. The mistake is due to the fact that we confuse the structure of the front and hind legs. It is different! Just compare your arms and legs.

The following pose is not natural, but is used quite often in animation when the characters move their paws like propellers. In the real world, the hind legs are not capable of more than 120 degrees of range of motion (even in cheetahs). Also, a real cat will strive to keep its head at the same level, and not lower it down (unless, of course, it's not a zombie cat - there are such in cartoons).

What an interesting skeletal structure! In this case, the bones just stick out of the thigh. The problem is that there are not only bones, but also, to a large extent, muscles. And this moment cannot be ignored. Also in the first pose we see the front legs tucked in and the hind legs sitting. Small cats eat in this position, but their chest is not on the ground. 
Another common mistake lies in habits. Cats during normal walking first carry two paws on one side, and then two paws on the other side. This mistake will go unnoticed by most people, but it will still be a mistake! True, during acceleration, cats switch to a “diagonal” movement of their paws.

You have learned all about poses. It's time to sketch your own drawing.

The structure of the cat's muscular skeleton
Muscles give the body shape. You can draw a body without understanding the structure of the muscular skeleton, but guessing is not our way. The learning process may seem complicated at first glance, but later you will see that in reality everything is much simpler.
To begin, add simplified muscle shapes to the sketch. Pretty simple! If your cat is going to be very fluffy, you won't need more. The muscles will still not be visible.

This is what our cat looks like after she has a basic set of muscles.

If you want to draw a smooth-haired cat, you will have to do more. Below you see the outlines of the largest muscles that can be seen. In order not to strain too much, just use this picture as a reference, and draw on it. After a few exercises, the structure will be remembered by itself.

Now our cat has a muscular relief!

Finally, one more thing. Cats have places in which the skin hangs freely, not tight to the muscles. If you have a cat, feel the area between the thigh and lower leg - you will feel only the skin and fur! Because of this feature of the skin, the thigh and lower leg are difficult to distinguish while the cat is sitting.

Draw these additional skin areas in your sketch.

3. How to draw cat paws
The hind and front paws of a cat are different from each other, just like our hands are different from our legs. You can use them to visualize the structure. Cats walk on tiptoe, using only part of the "palm" for support. They also have a “thumb” (in the form of a drop) and a small appendage (pea-shaped), but only on the front paws. The hind legs are generally very similar to our legs.

Cat paws are absolutely amazing. Their claws are "retractable", but they do not work quite the way we usually imagine. The claw is attached to the last bone of the finger. However, not to its extreme part, but closer to the base. Only when the claw is fully released does the connection move closer to the edge.
What does this mean for us? The claw, along with the small bone to which it is attached, is found on the outside of each toe. The claw is not symmetrically located on the finger! Look at the photos of Sphynx cats - they have no hair and the structure of the claws can be seen better.

Below you see an image of the left and right front paws with folded nails. Try repeating this position with your hands to see where the forearm ends and the foot begins.

Let's learn how to draw paws.


We will also need to add a bean-shaped shape (on the outside) for the hind legs, or an elongated shape (on the inside) for the front legs.

Now we will cover the entire paw with fur. Above the claws, the wool grows in a special way: we cover it with fur only on top and on the sides.

Good. We figured out the paw with folded claws. But what about an angry cat that has released its claws? Everything is simple if you have mastered the anatomical part.

Now our cat has paws.

4. The proportions of the cat's head
Depending on the breed, cat faces differ from each other. But there are rules by which you can draw a "typical" cat face.
Draw two circles: one big, one smaller. These are simplified forms of the head and muzzle.

Divide the small circle into six approximately equal parts.

Divide the midline into about six equal parts. This will help us find the correct position for the nose and mouth.

Draw a regular triangle between the lines as shown below. You can also start drawing the mouth.

Draw the rest of the features of the muzzle using the lines as guidelines.

Now we will determine the place for the location of the eyes. Add four guide lines using the existing ones.

Now you just need to add the eyes.

If you are drawing a kitten, you need to change the proportions a bit and draw more rounded eyes of a larger size.

Add lines for the shapes of the ears and cheeks.

Drawing a head in profile is not more difficult if you know how to place the guide lines.

Now we know how to draw the shape for the head. But it's still just a sketch. In the following steps, we will look at each element individually.

5. How to draw cat eyes
If you went through the previous steps, you should have an oval like this as the base for the eye.

We have three elements around the eye itself: the edge of the lower eyelid, the upper lash line, and the dark area in the inner corner of the eye. Part of the third century can also be shown.

Draw the pupil:
Pupil size can play a role in the realism of an illustration. If you draw a cat sitting on a sunny beach or in front of a fire with a large round pupil, it will look unnatural.

Add dark streaks around the pupil and lighter ones in the rest of the eye. Position them in the direction from the pupil to the outer part of the eye.

The eye consists not only of the pupil and the apple. When you draw a human face, you draw in the eyelids, eyelashes, and eyebrows to make it appear more complete. For the cat's eye, we can add light areas around the eye and a dark hollow above it - this is a depression from which several vibrissae grow.

When the eyes are closed, the incision turns into a dark streak. The light areas get closer to each other.


You already know how the eyes should look. You can draw them on the muzzle.

6. Draw the cat's nose
Let's start with an elongated figure in the shape of a crystal. Its lower part is usually darker.

Draw two "wings" as nostrils.

Draw the nostrils. They don't look like human nostrils, so be careful.

Draw a bridge. It should be rounded at the top. Also on the sides of the bridge of the nose will be darker, and the hair on it will be shorter.

Now our cat has a nose!

7. How to draw cat ears
Cat ears are not as simple as they seem. These are not just triangles, but complex structures that need to be learned to make the drawing seem more realistic.

To draw the ear from the front, draw a circle. Then divide it into four parts by drawing lines at a slight angle.

Use guide lines to draw the outer outline of the ear.

Cats have a strange crease at the bottom of their ears. It's called "goat". It is quite difficult to draw it from this angle, but it is necessary. Draw a tragus and people will think you're a cat expert! :) 
Now you can draw tufts of hair. Their length and volume depends on the breed, but in general it is better to "fasten" the hair to the inside of the shell, leaving the outer bare. 
But cats can move their ears! What about all the other provisions? You can use the same method to create ears in any position. The main thing to remember is that the ear is actually much larger than it seems! The bottom part is usually covered with fur (and you will need to draw it too). Look at this photo and you will understand which part of the ear we see and which is hidden. 
Now our cat has ears! 
8. Draw a mustache for a cat
Whiskers, or whiskers, are another sense organ for a cat. Vibrissae grow above the cat's upper lip, above the eyes, above the chin, and behind the paws. These "hairs" grow from the dark "hollows" in the cat's coat. We have already drawn such hollows above the eyes. Now draw smaller ones on the muzzle. 
Cats have 12 whiskers on each side, but you don't have to strictly follow this number. 13 left, 15 right - all right! The main thing is to draw them thin and light. Also, their length should be more than half the length of the head. 
9. Draw wool
The length of the coat determines the shape of the head. The head of a cat without hair is triangular in shape. The more wool, the smoother the shape of the head. Draw a medium-length coat on the cat and the head will become round (by the way, this is why kittens seem cuter to us). If your cat is long-haired, then the shape of her head becomes trapezoidal. 
The shape of the body also depends on the length of the coat. Short hair will emphasize the cat's thin body, long hair will make it look bigger. If you are just learning to draw, always start with short hair. Then experiment with the length as you wish. 

The author of the lesson Monika Zagrobelna
Translation - Desk
Knowledge of the anatomy of four-legged animals and birds when working on their image is no less important than knowledge of human anatomy. True, the movements of animals are not as diverse as the movements of a person, but on the other hand, a person can be drawn in any position, since a person poses, and animals, with rare exceptions, cannot be forced to pose like a sitter. It is especially difficult to make an animal repeat the desired movement, the desired pose, the right angle, and the artist needs to be able to depict animals at rest and in motion, in any pose, in any angle, and here you can’t rely only on the eye, you can’t just copy. It is necessary to catch the most characteristic, to make arrangements of the figure from different poses and even from different identical "sitters". In this case, such an approach is applied. The artist stands at the cage where the nature is moving (it is desirable that there are several identical copies) and starts several drawings on a large sheet at once from the poses that the animals take. I drew one drawing, the pose changed, started another, changed again - started the third (it is possible from another copy), etc. Nature, one or the other, necessarily repeats the pose, at least approximately - you can return to the previous drawing, to the next and so on, and on each of several drawings the image is gradually increased and enriched.
All this requires close attention and great patience and mobility on the part of the artist. At the same time, you can’t sit - you have to walk and even run from place to place.
This is a method of cognitive three-dimensional drawing. But there is also the method of dashing quick sketches, which are very effective, but there is little cognitive in this method, since the drawings are mostly planar and there is no time for volumetric analysis. In both cases, the image of animals and birds is a kind of hunting for the right pose, resulting in many sketches that are very difficult to tie into a harmonious whole if you do not know the basics of building animals. Only the plastic anatomy of animals can serve as this basis. But since animals are studied in less detail than humans, it is sufficient for the artist’s usual work to have a basic understanding of their anatomical structure, that is, of the skeleton and the location and action of the main muscle masses.
With all the variety of four-legged animals and birds, it turns out that human anatomy is so similar to the anatomy of animals that it is enough to compare them to get an idea of the anatomical structure of animals and even be able to apply the same methods of building a figure that are used in depicting a person.
“To feel, to know, to be able is a complete art”, - the outstanding artist-teacher P. P. Chistyakov defines the art of the artist. Depicting a person, an animal, the artist must know its structure, its anatomy. “The hand consists of bones, tendons, muscles, covered with skin. In order to fulfill it properly, it is necessary to study the bones, build them in accordance ... ”says P.P. Chistyakov in another place, setting out his program requirements, and he, in a letter to P.F. Iseev, speaking about anatomy and perspective , writes with chagrin: “The students know these subjects, but do they know how to apply them in practice? Not! Not! And no.” Do our contemporaries - artists know how to apply the knowledge of plastic anatomy in practice, and if they don’t, then whose fault is it? These are the questions that should be of interest to artists-educators today as well. Plastic anatomy is taught, and in the manuals it is presented in a very conscientious manner, with full knowledge of the factual material, but with such a "disengagement from production" that it does not achieve its direct goal. A student can conscientiously attend a course, and receive no information about the application of anatomy in practice when building a figure. Teachers of visual disciplines do not always use the method of three-dimensional anatomical construction of a figure, which would summarize for the student the information received by him in anatomy. Meanwhile, an artist who does not know anatomical construction (although he has studied anatomy) cannot freely master the drawing of a human figure, cannot use a model, but only copies the model, which leads to slavish dependence on the model, to a naturalistic drawing. Disunity between the study of plastic anatomy and its application is characteristic of many manuals and methods of teaching this subject.
mammals
If we compare the anatomical structure of a person put on all fours with the image of other mammals - ungulates (horse), large cats (lion) and dogs (Fig. 70, 71, 72, 73), then one can find not only similar elements of the skeleton, but also make sure of the great similarity of their location and interconnection. For example, the vertebral column in animals also serves as the main core of the skeleton: it is connected

it extends beyond the pelvis, thorax and head, but unlike the human, it continues beyond the pelvis, forming a tail; and the cervical region is longer and differently curved. The chest is compressed not from chest to back, as in humans, but from right to left (the number of ribs and vertebrae varies). The pelvis retains the same bone elements and the same protrusions, which can be judged from the exterior (in a horse, the protrusion corresponding to the anterior iliac spine is called a maklok), but is elongated and compressed from right to left. The constant position of the body in animals is horizontal, since all four limbs mainly carry out a supporting and motor function, although in predators, especially cats, the forelimbs also retain the ability to grab, which is characteristic of humans and monkeys.


Unlike humans, most animals do not have a collarbone (Fig. 74), the shoulder girdle consists of shoulder blades, which are connected to the chest only by muscles. The humerus is usually shorter than the bones of the forearm; it articulates with the scapula at the shoulder joint, but the bone itself is hidden under the muscles and the shoulder does not protrude separately from the body, as in humans. In animals, only the lower end of the bone is visible, which forms with the bones of the forearm (or underarm, as it is called in animals) the elbow joint. Thus, the free forelimb, unlike a person, is visible only from the elbow. The forearm skeleton also consists of two bones, only its structure differs in ungulates and predators. The ulna of ungulates is greatly reduced and the radius serves as the basis; they are fused motionlessly in the position of pronation - the hand is turned with its back side forward, the movements of pronation and supination are completely absent, since there are no grasping movements and the bones carry only a supporting function. The forearm rests on the bones of the hand (paw), forming a carpal joint (in everyday life this place is incorrectly called the knee). The pastern is in a straight line with the forearm and cannot be extended forward, as is typical for a person. The metacarpus rests on the phalanges of the fingers. In different ungulates (Fig. 75), a different number of fingers serves as a support: a pig has four, a cow has two, a horse has one. The finger rests on the hoof; thus, ungulates step with their front feet on the ends of their toes.
In large and small cats, the forearm partially retained its grasping function, and both bones are movable relative to each other (see Fig. 75). The front paw steps in a position of pronation, but when attacking, tormenting prey, etc., it freely supinates and pronates (which is easy to see when observing a tiger or lion, even a cat). The metacarpus consists of five bones and lies on the same line with the forearm, the fingers are strongly bent forward, with the exception of the first, which hangs. The anterior phalanges of the cat can bend upward, hiding the claws, and when bent, the claws are “released”. In dogs, the forearm consists of two bones, the movements of supination and pronation exist, but in a smaller volume. The paw also steps in a pronation position (just like in almost all four-legged mammals), the first toe hangs like in cats. The first phalanxes of the remaining four fingers do not curl up - dogs do not hide their claws. Both cats and dogs step on the palmar surface of the four fingers and on the heads of the metacarpal bones.
The shoulder blades protrude strongly on the surface of the body. The sternum lies deep; on both sides of it, the heads of the humerus, covered with muscles, strongly protrude, the elbow and wrist are embossed under the skin. In predators, the metacarpus and phalanges are less prominent than in ungulates.

The hind limbs of all tetrapods are connected to the pelvis by the hip joint. The femur is almost entirely hidden under the muscles of the body; the thigh does not protrude separately from the body, as in humans; only the greater trochanter and the lower end of the femur are visible, which forms the knee joint with the bones of the lower leg. The patella and the ends of the bones show through under the skin. The lower leg at an angle goes back and articulates with the metatarsus in the ankle joint (the joint in animals is called the hock, and the metatarsus is the metatarsus). In ungulates, the tarsus in a calm state stands vertically and articulates with fingers - in pigs - with four, cows - with two, horses - with one. The toes rest on the hooves, so the hind legs of ungulates also step on the ends of the toes. The hock joint and calcaneal tubercle are located very high in ungulates, and slightly lower in predators.
Predators step on unbent fingers and heads of metatarsal bones. There are four metatarsal bones in predators, there are also four fingers

(1 finger is not always the case). A man, a monkey, a bear, on the contrary, step on the whole foot. On the skeleton, the bones of the pelvis protrude from behind - the iliac, ischial tubercles; on the thigh - a large trochanter, condyles, patella, on the lower leg - condyles and both ankles. The calcaneal tubercle stands out sharply on the foot.
The movements of mammals that occur in the joints are the same movements as in humans (if the position of the human body is likened to the position of an animal). The shoulder blade slides along the surface of the chest, it withstands the main load when the front leg rests on the ground, supporting the body. In such cases, with a step, the shoulder blades alternately rise above the surface of the back, and the body sags (as on a spring), supported by the shoulder blade, which is especially noticeable in large cats. With a strong swing of the front legs, the scapula moves back and forth like a pendulum or the whole, transferring the shoulder, and therefore the leg, which, of course, changes the relief of the body, especially the front surface of the chest (Fig. 76).
The movements in the shoulder joint are the same as in humans, with the exception of rotation and abduction to the side. The adduction movements are of a constant nature, otherwise the paw would deviate to the side - it is kept near the body all the time. As for the movement back and forth in the shoulder joint, they have a large scope and greatly affect the relief of the body, especially when extending forward. In this case, the humerus is thrown forward, transferring the elbow joint forward along with the lower part of the front leg (Fig. 76), and since the humerus is also covered with the muscles of the body, the front half of the chest becomes more convex, which lengthens the body from the side of the shoulder bent forward. The movement is carried out in a fast run and is further enhanced by moving the shoulder blade forward - this further increases the relief of the chest. Corresponding reverse order changes occur when the shoulder and shoulder blade are thrown back; the elbow joint and the lower part of the leg are moved back, and the surface of the chest is smoothed out - the trunk on this side becomes shorter (Fig. 76).
In the elbow joint, flexion and extension occur in much the same way as in humans. When the animal is standing, the elbow joint is extended, the forearm is vertical, and the shoulder and forearm form an obtuse angle rather than a straight line, as in humans (compare figures 70, 71, 72, 73). As stated above, the front foot steps in a pronation position, but in many animals, due to the mobility of the bones of the forearm, there are movements of both supination and pronation; they are possessed by large and small cats (tiger, lion, puma, jaguar, etc.), bear, hares, rabbits, squirrels, many rodents, but not ungulates.
In the carpal joint, mainly (especially in ungulates) movements of flexion and extension occur, and extension stops when the metacarpus forms one straight line with the forearm. In ungulates, flexion, especially passive (when lying down), stops at the moment of contact between the surfaces of the hand and forearm (Fig. 77); in predators, the range of flexion usually corresponds to that of a human.
The fingers also have flexion and extension movements, and in predators and some rodents, movements to the side (in a cat, when it “flexes its claws”, a hare, when it cleans its front paws).
The muscle groups serving these movements are also located almost like in a person (see Fig. 71, 78).
The scapula is connected to the chest and moves along it with the same muscles as in humans (dentate, trapezius, rhomboid). The scapula is also connected to the humerus by muscles similar to
human (the deltoid muscle has lost the function of abduction here) ". Part of these muscles, lying superficially, flexes the leg at the shoulder joint and thereby throws the shoulder, and therefore the leg back; these muscles, when tensed, sharply border on the back of the extensors of the elbow joint. In addition, flexes the leg at the shoulder joint and throws the shoulder back along with the shoulder blade as well as the latissimus dorsi muscle.Extension in the shoulder joint, that is, the extension of the shoulder and leg forward, is performed by another part of the muscles going from the shoulder blade to the shoulder - these muscles

relief does not form. In horses, the brachiocephalic muscle, which is similar to the human sternocleidomastoid muscle, participates in bringing the shoulder forward (the ion is relief); only in the horse is it attached to the humerus and extends the shoulder joint.
The extensor muscles in the elbow joint (triceps, etc.) * are located behind and are very powerful, as they have a supporting function. The flexors lie in front and are insignificant, as they bear little load. They are almost entirely covered with muscles that attract (leading

shim) humerus and forearm to the body; these muscles (pectoralis major, etc.) are located in front, forming two powerful tubercles on the anterior surface of the chest, covering the humerus in front (a hollow is formed between them, in the depth of which the sternum is located). These tubercles are alternately brought forward when running along with the scapula and humerus.
Between the two muscle groups - the triceps and the flexors of the elbow joint - the main muscle group comes to the surface

forearms - extensors of the hand. This is a very characteristic and relief place, important for the plastic connection. The adductors and flexors of the elbow joint are attached to the bones in the gap between the extensors and flexors of the hand. The flexors (hands), as in humans, lie on the back surface, the extensors on the front surface of the forearm. The extensors of the hand are also involved in flexion of the elbow joint. In general, the forearms of large cats (lion, tiger) are strikingly similar to the human forearms both in shape and in movements.
In the hip joint, movements of flexion and extension and constant attraction to the body (adduction) occur, since abduction movements are almost excluded (as well as in the shoulder).
Since the thigh is covered by the muscles of the body, its flexion carries the entire mass of the posterior muscles of the body forward (together with the knee joint and leg) and thereby changes the relief of the corresponding buttock and half of the pelvis (see Fig. 76). Similarly, extension produces a reverse movement. In the knee and ankle joints, as in humans, flexion and extension occurs (in the knee of ungulates there is no rotation of the lower leg, which exists in cats and humans with a bent knee).

When standing still, the thigh is directed forward and forms an angle with the lower leg, open to the back (in a person in this position, the thigh and lower leg form a straight line). In the ankle (hock) joint, the foot is directed almost vertically downwards and in ungulates steps only with its lower part; a man, a bear, a monkey walk with the whole foot. Also, in carnivores and ungulates, unlike humans, the foot can produce a more extensive forward movement, that is, closer to the lower leg, even in contact with it, especially when lying down.
In predators, the foot steps on the plantar surface of the fingers and on the heads of the metatarsal bones (see Fig. 77).
The muscles of the hind legs (see Fig. 72, 78) are located according to the main supporting functions of the limbs and, just like in humans, the main groups are the extensors. The group of gluteal muscles almost does not carry (characteristic of a person) the function of supporting the trunk in an upright position - the muscles perform this work only when the animal stands on its hind legs. In animals, the gluteal muscles mainly carry out the function of the extensors of the hip joint, which is of great importance for forward movement (especially important in heavy horses). The rest of the posterior muscle group, including the posterior muscles of the thigh (semitendinosus, semimembranosus, biceps) and the posterior muscles of the leg (triceps), in horses passes into the common Achilles tendon, which is attached to the calcaneal tuber, and produces extension of the hip and bending back of the ankle (hock) joints. In predators, the places of origin and attachment of these muscles vary, but they do the same work. If at the same time there is an extension in the knee joint, then the entire hind leg is thrown back. The knee joint is extended by the quadriceps muscle located in front of the femur. Ahead and more superficial than the quadriceps, sharply bordering on the side wall of the abdomen, lie the muscles that flex the hip joint and thereby transfer the thigh and the entire leg forward. On the front surface of the lower leg are muscles that bend the foot and fingers forward; back between the bones and the Achilles tendon lie the muscles that bend the foot and fingers backwards. If you look at the animal from behind, then on the inside of the leg between the pelvis and thigh, you can see a group of adductor muscles (see Fig. 78).
The pelvis, thigh, and lower leg are covered with fascia similar to that of the human thigh. They hold the muscles near the bones and in some places form transverse impressions when the muscles are tense.
The muscles of the trunk are in general similar to the muscles of a person and no special relief is found here.
On the neck, the posterior group of muscles is very massive, supporting the neck, stretched forward and upward. In front of the neck, along the midline above the jugular cavity, the windpipe stretches upward, on both sides of it there are muscles similar to the sternocleidomastoid of a person; they are especially prominent in horses (see Fig. 72, 78).
The muscle corresponding to the human sternocleidomastoid in horses consists of two muscles: the sternocephalic and brachiocephalic (due to the lack of a collarbone, the muscle is attached to the shoulder). Above under the lower jaw on the front side of the neck between the right and left muscles (like in humans) is a breathing tube. The brachiocephalic muscle below and inside borders on the pectoral muscle; she unbends the shoulder, i.e., brings it, and, consequently, the leg forward. With the forelimbs fixed, these muscles bend the head forward; that characteristic “nodding” is obtained, which is observed when
Yes, the horse rests with force with its front legs, as if climbing, taking a lift, pulling a heavy load or overcoming another obstacle.
The animal skull has the same elements as the human one (only in humans, the brain part predominates, and in animals, the facial part). There is bilateral symmetry, there are upper and lower jaws. Cheekbones, zygomatic arches, eye sockets, frontal bones (even with superciliary arches in elephants, dogs and large cats). The laws for constructing a skull drawing are the same as for a person: it must be built as a symmetrical shape, outlining the middle line of the cheekbone, lower jaw, etc. (Fig. 79).
When building an image of an animal, start by linking large volumes of the chest with the shoulder girdle, abdomen and pelvis, add volume to what will be convenient (after all, the animal does not pose) - legs, neck with head, etc., remember the bilateral symmetry of the torso and work, by all means outlining the median line. When drawing symmetrical elements on the torso or head, combine them immediately with each other. Always remember the skeleton, how it lies in the trunk and in the head, and how it lies in the limbs; the skeleton is the basis of construction - not a single body or limb array can be solved without a clear idea of \u200b\u200bthe skeletal connection. The liveliness of the image depends mainly on the correctly planned connection.
As on a person, the contour is fluid and elusive and becomes clear and conditional only with a clear and clear understanding and combination of volumes. Therefore, in a cursory drawing of an animal, look for combinations of volumes, and do not chase only for a spectacular outline. Both in the drawing of a person and in the image of an animal, a contour appears, sometimes thick, sometimes very thin, goes inside the figure and disappears, and because of it another contour appears - this is the result of the relationship of volumes that lie one on top of the other and arise one for the other
When constructing a volume, its surface is depicted, which the farther from the eye, the more it goes into perspective, until a contour is formed on the boundary of the volume. Therefore, the contour is a view of the surface, therefore, depending on its illumination, it is uneven, then it is thick, then thin. The volume has disappeared behind another volume - the contour disappears, and a new contour appears from the depth of the image, which is formed as a view of the surface of the new volume. This contour goes to the border of the figure and is hidden again to give way to another contour belonging to another volume, and so on until the contour of the entire figure appears.


Make the construction of the skeleton of any four-legged animal from nature, slightly foreshortened (Fig. 80) in front and behind (without finishing, only construction). When drawing, compare with the human skeleton and be aware of what in the structure of man and animal corresponds to each other. Observe any animal, mentally imagining how its skeleton is located. If you can, make constructive sketches from it from different sides, from different angles (Fig. 81). When studying animals, avoid using stuffed animals. Stuffed animals are often made without strict consideration of the design of the skeleton, which is why the shape in them is knocked down.
frog, lizard
Amphibians (frog) and reptiles (lizard) have the same skeletal elements as mammals (Figure 82). The difference is that their belly in a calm state is adjacent to the ground, the structure of the body

(the ratio of the pelvis, spine and chest) is not as prominent as in mammals, the lizard has a longer and more massive tail, while the frog does not have it, the frog has four fingers on the front and five on the hind limbs. In addition, the shoulders and hips move to the side, have a separate shape from the body, and the joints are designed so that, in addition to movement, they can easily lay the body on the ground and lift it off the ground.
Questions. The chest, pelvis and spine of a quadruped - their similarities and differences from humans. Shoulder girdle and forelimb - their similarities and differences from human ones. Pelvis and hind limb - similarity and difference from human. Muscles and movements of the shoulder girdle and forelimbs. Muscles and movements of the hind limbs. Skull, head, neck - similarities and differences from human.


