In this tutorial I will show you an easy way to draw a Christmas tree step by step with a pencil. If everything is done correctly, even a child can easily cope - the main thing is not to be lazy and try again and again if it doesn’t work out. Prepare pencils and paper and you can start drawing step by step. In order to draw a Christmas tree with a pencil in stages, it does not take much time, usually the whole process, along with coloring, takes from 10 to 20 minutes.
The first step in drawing a Christmas tree is the base. The Christmas tree has a triangular shape, narrowing at the top and expanding towards the bottom, so we draw such a neat triangle. It will need to be deleted later. If you are just learning to draw, it is better not to use a ruler for sketching - practice drawing everything by hand. So, we have drawn the base of the Christmas tree, you can proceed to the next step.

Further, from the very top of the Christmas tree, we begin to gradually draw its contours of the branches in this way. At the top of the Christmas tree we draw narrower, gradually its branches will expand. In the process of drawing a Christmas tree, be sure to note what shape each section has, and try to repeat as accurately as possible.

We continue to draw until the very bottom of the Christmas tree. Drawing a Christmas tree will be easier if you have a base, as you will have something to focus on, and you will not get confused in the proportions of this tree.

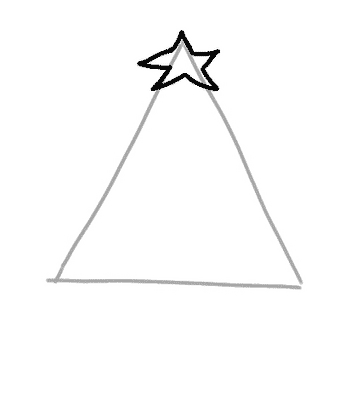
Draw a star on top and a tree trunk on the bottom. At this stage of drawing a Christmas tree, you can erase the base so that it does not interfere with us and no longer distract us from the main task, it has already completed its function.

We begin to decorate our painted Christmas tree with garlands with bows. If you want to draw a beautiful Christmas tree, try to show your imagination in the process of creating decorations. Remember what your favorite Christmas tree looked like, look at photos and drawings on the Internet and try to repeat.

You can draw on the Christmas tree with a pencil any decorations that you like best. It can be plastic or glass shiny balls, bows, figurines of animals and characters, and much more. The easiest way, of course, is to draw balls, and if you are drawing a Christmas tree with a child, you can limit yourself to only them.

Don't forget to color your Christmas tree green, and color your toys and other decorations. Nearby you can draw and , as well as and . You can also depict colorful gifts and in general any background to fill the Christmas tree drawing with a festive mood.
We hope that you had fun drawing a Christmas tree, and everything turned out great. Here is another way to draw a Christmas tree, we will show you how to draw only a Christmas tree without toys, and you can add the rest to your taste. This drawing of a Christmas tree is a little more difficult, but more realistic, so it will suit more experienced artists. Let's start with this slightly curved base of our painted Christmas tree.

As a basis, we draw several such triangles overlapped by each other. In our opinion, it turns out very nice. 
Make the base lines light, because on top we will draw spruce branches. We start drawing a Christmas tree from the very top. 
Gradually we move lower and lower. 
At this stage, we draw the lowest layer of the branches of our Christmas tree for the new year. 
The New Year is coming soon, and before you decorate a Christmas tree at home, learn how to draw it with a pencil and paints.
“A Christmas tree was born in the forest, it grew in the forest ...” - who did not sing this wonderful New Year's song in childhood? For the New Year, everyone: both children and adults, want a holiday and New Year's miracles.
One of these miracles can be drawing a Christmas tree, although if you can draw, then you can do it without prompts. But if you are not so hot what an artist, or you want to have fun, in a New Year's way, spend time with your child, then such a drawing lesson, which is offered here, is just for you. So, draw a Christmas tree
There are several options to start drawing a Christmas tree.
For example, the first option:
Another option:


The most simple option:

 A simple drawing of a Christmas tree: stage 1.
 A simple drawing of a Christmas tree: stage 2.
 A simple drawing of a Christmas tree.
In addition to pencil drawings, the Christmas tree can be immediately painted with paints.
But still, it is better to start such a drawing with a pencil sketch of a triangle on a stand-leg.
After that, the fluffiness of the Christmas tree is painted on with a brush and paints.
IMPORTANT: Before proceeding to the next stage of painting, you need to make sure that the previous layer of paint is already dry.
At the last stage, with different touches of the brush, New Year's decorations are drawn on the Christmas tree, and under it are gift boxes of different sizes.
 Drawing a Christmas tree with paints: stage 1.
  Drawing a Christmas tree with paints: stage 2.
 Drawing a Christmas tree with paints: stage 3.
  Drawing a Christmas tree with paints: stage 4.
 Christmas tree drawing with paints.
 You can also try drawing a Christmas tree by drawing circles around the line of symmetry with a brush. You will get an original Christmas tree, which is also decorated, as far as imagination is enough.


IMPORTANT: You can also draw a Christmas tree, leaving it in nature, as if it were decorated right in the forest or in the yard. To do this, in addition to the Christmas tree itself, you need to draw a background for it. The background can be snow-covered snowdrifts or air drawn with light, thin colors. At different times of the day, the air will have different shades - from blue to pinkish-purple.
Christmas tree in nature.
I have carefully chosen several schemes for drawing a Christmas tree various levels of difficulty. Choose the one you like best.
One of the schemes is in this video!
Although the method is the most difficult, but such Christmas tree pretty cute. And considering that all kinds of gifts are conveniently arranged under it, it is generally wonderful. This diagram demonstrates how to draw such a Christmas tree step by step.
And this is real forest beauty, magnificent, luxurious and so beautiful! I hope the circuit is not too complicated for you.

Here is another Christmas tree big asterisk. Don't forget about her either. This decoration has already become traditional!


This diagram shows in great detail the process of creating a small New Year's masterpiece. First you need to draw a triangle, and on its top a beautiful star.


The tree has to hold on somehow. I suggest putting it in a bucket.

It remains to add some decorations, toys, bows and, of course, color. Color the tree carefully. That's all!


This tree is based on a large triangle. Attached to it stand, branches, decorations.

Another good scheme and again with gifts=)

And this one is not bad, slender, lush, easy to perform. But the choice is yours!)

The last diagram will help you learn how to draw a Christmas tree in most naturalistic.

With Christmas trees, it seems, we figured it out. If you don't really love paint, you can from paper, cardboard or fabric. You will find interesting tips on how to do this in.
Spruce? It is very difficult to find a person who has never painted this tree in his life. But if you do not know how it is done, our article will teach you this simple matter.
Spruce - this is which everyone associates with the holiday, the New Year! This evergreen coniferous beauty for children becomes a real green fairy, delighting them on the morning of January 1 with gifts hidden under the branches. Does your child ask you to draw a Christmas tree? Or maybe you need to make some composition with her for a children's party or a matinee in the garden?
We will be happy to provide you with some simple master classes that will teach you how to draw a fir tree step by step.
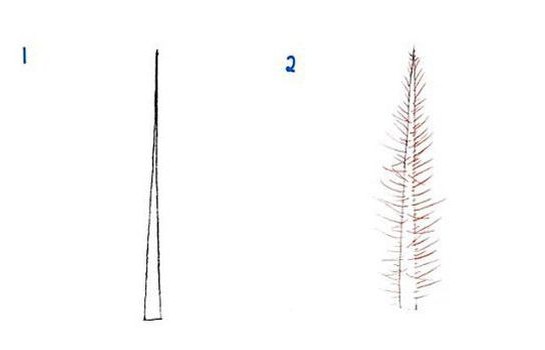
The first method, which we will consider in our article, will be based on drawing a tree from its top. Learn to draw such a spruce. And then it will not be difficult for you to create a whole forest on a piece of paper!
So, how to draw a fir tree, starting from its top? Everything is very simple!

The first way of depicting spruce is not bad, but, you see, it is much more convenient to draw from the bottom up, and not vice versa. This makes it much easier to adjust and plan the height of the tree.
How to draw a fir tree from bottom to top? Now let's show!

How to draw a fir tree in the simplest and most unpretentious way? We know it and will definitely share it with you. With this method, even a small child can draw a Christmas tree.
But what if you don’t need the whole tree, but need, for example, only one of its branches? Well, we'll tell you about that too. Arm yourself with pencil and paper, let's get started!

The drawing is ready!

Now you know how to draw a spruce branch yourself. You can even teach it to your child, for example.
Using the methods described above, you can draw a branch of a coniferous tree or the spruce itself with a pencil, felt-tip pens and even paints. The tool in this case does not really matter. Draw, create yourself and with your children.
New Year's drawing is a wonderful gift for the holiday and a great idea for decorating a magical interior. Especially if you make it together with a child, because, as you know, children's creations carry a special charm.
Here we will talk about the easiest way to depict a Christmas tree with gifts under it. You will very easily create a whole Christmas tree composition, and in the future you will be able to draw pictures for other holidays.
To make the Christmas tree neat, first of all, you need to prepare well-honed pencils, a ruler and a sheet of paper. Now we create the base of our holiday tree. To do this, we draw an isosceles triangle elongated upward. Do not press hard on the pencil. After the Christmas tree with gifts is ready, the base can be carefully erased.
Stages of drawing.
Next, we start right from top to bottom to gradually draw the branches, making sure that they are symmetrical. The lines should be smooth. Next, decorate the top with a star, and depict the trunk below. Now it remains to decorate our Christmas tree.
You can create balls and snowflakes on twigs, or you can create sweets and other New Year's toys. The garland with pretty bows looks very cool. We carefully color the drawing and admire the New Year's tree. You can draw stars around the Christmas tree. In general, choose any style.
It remains to “fold” gifts under the tree. It can be just dolls or bears, but it is much easier to draw boxes with ribbons. What exactly is in them, everyone can think out for himself. The gift pattern is, in fact, universal. Once you learn, you can create beautiful gifts for any occasion.
 To do this, follow the following algorithm.
You can draw a bag of Santa Claus under the tree. The base in this case is a rectangle. We make simple stripes on the sides by hand - these are the future folds of the New Year's bag. Next, you need to slightly round the bottom so that the bottom looks like a real one. We remove extra lines and depict toys “peeping out” of the bag.
It is even easier to draw a tied bag under the Christmas tree. This is done immediately by hand, since an even shape will only harm here. We designate rounded sizes and simply give the necessary outlines. To complete the drawing, we depict ties or a beautiful bow.
It remains only to paint the bag as fantasy suggests, and your masterpiece can be considered ready. Your Christmas tree deserves to be seen by as many people as possible. A picture made with a child can be presented to grandparents for the holiday.


